Introduction
A welding table is the foundation of every successful fabrication project. Without a stable, heat-resistant work surface, accuracy suffers and safety risks increase. Many fabricators end up with warped, out-of-square, or unsafe results because they improvised a work surface instead of building one correctly.
Welding over mill scale and contaminated surfaces is one of the leading causes of porosity, lack of fusion, and weak joints — which means the table itself directly affects weld quality, not just convenience.
Getting it right requires more than cutting steel to size. This guide covers everything — steel selection, table dimensions, structural design, step-by-step assembly, and the common mistakes that derail a first build.
Key Takeaways
- Building a welding table requires carbon steel (3/16"–3/8" thick top), a sturdy frame, and basic welding and cutting tools
- Standard beginner table dimensions are 36–48" long × 24–36" wide, at a working height of 34–38"
- Clean all metal surfaces before welding — mill scale and oil cause weak, defective welds
- Tack weld the frame first to catch and correct alignment issues before committing to full welds
- Disperse heat across the frame in short intervals to prevent warping
What You Need Before You Start Building
Good preparation makes the difference between a table that's square and solid versus one that wobbles and fights you. Skipping the planning phase is the #1 beginner mistake — and it leads to miscut materials, weak joints, and structural headaches down the line.
Tools and Equipment
Essential tools required:
- MIG or stick welder — capable of welding 1/8" to 3/8" mild steel
- Angle grinder — with both grinding discs (for removing mill scale) and flap discs (for smoothing welds)
- Metal-cutting chop saw or plasma cutter — a reliable 14" abrasive or carbide-tooth chop saw produces the square cuts your frame depends on
- Framing square — for checking 90° corners during assembly
- Clamps — C-clamps and sash clamps to hold components firmly during tack welding
- Tape measure and metal scribe — for accurate marking before cutting
Materials needed:
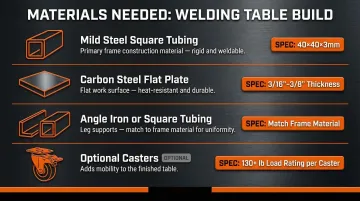
- Mild steel square tubing — 40×40×3mm or equivalent (1.5" to 2" square with 1/8" wall thickness) for the frame
- Carbon steel flat plate or slats — 3/16"–3/8" thick for the tabletop
- Angle iron or square tubing — for legs (same material as frame)
- Optional casters — rated 130+ lbs each for mobility (commercial tables use casters rated up to 440–1,760 lbs per leg for heavy-duty applications)
Safety Equipment
Required PPE:
- Auto-darkening welding helmet
- Thick leather gloves
- Long-sleeve cotton or leather shirt
- Safety glasses
- Hearing protection during cutting
- Steel-toed boots
Critical safety warning: Welding should always be done in a well-ventilated area and only on bare, uncoated metal. Zinc fumes from galvanized coatings are a serious health hazard.
How to Build a Welding Table: Step-by-Step
The build follows a logical sequence: plan → cut → prep → frame → top → finish. Skipping or rushing any stage leads to structural or flatness problems downstream.
Step 1: Plan Your Dimensions and Design
Table size decisions:
- Beginner-friendly dimensions: 36–48" × 24–36" for most home and small shop projects
- Working height: 34–38" for standing welders; 28–32" for seated work
- Height guideline: The table surface should sit just below your natural elbow height when arms hang naturally (typically 2–4 inches below elbow height for precision work, per CCOHS ergonomics guidelines)
Tabletop style trade-offs:
- Solid plate: Full flat surface, simplest for beginners, best for general-purpose welding
- Slat-style: Cheaper (uses flat bar spaced ~40mm apart), allows mid-table clamping access from below
Draw or download a simple cutting list prior to ordering material. This prevents waste and ensures every component is sized correctly.
Step 2: Cut Metal to Size
Mark all components (frame rails, cross braces, legs, tabletop/slats) with a scribe before cutting. Use a metal-cutting chop saw for square, clean cuts.
Cold saws operate at slower speeds with high torque, producing bright, square, burr-free edges that need no secondary cleanup before welding.
Avoid using:
- Wood miter saws (not rated for metal)
- Freehand angle grinder cuts (produce out-of-square or rough edges)
Allow 1/8" extra on length and width cuts for finish grinding.
Step 3: Prepare Metal Surfaces
Remove mill scale from all weld areas using a flap disc or wire wheel on an angle grinder. The AWS D1.1 Structural Welding Code requires surfaces to be free from loose or thick scale, slag, rust, moisture, and grease. Welding over mill scale causes poor fusion, porosity, and weak joints.
After grinding, degrease cleaned areas with acetone. Acetone effectively removes oils and greases, evaporates quickly, and leaves no residue. Avoid mineral spirits for final prep — they leave an oily residue that contaminates the weld pool.
Step 4: Square, Clamp, and Tack Weld the Frame
Assembly sequence:
- Lay frame components on a flat surface
- Check all corners are 90° using a framing square
- Clamp everything firmly before striking an arc
- Apply small tack welds at each joint first — do not run full beads yet
- Verify squareness by measuring diagonals corner-to-corner; both measurements must be equal
- Add more tack welds if anything shifts during this phase
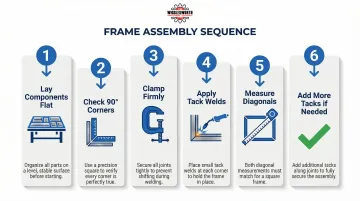
Once diagonals match, the frame is locked in — move to legs and structural bracing.
Step 5: Attach Legs, Cross Braces, and Full Weld the Frame
Structural reinforcement:
- Place legs at each corner, confirm plumb alignment before tacking
- Add lower horizontal cross braces or diagonal bracing to prevent racking and flexing under load — critical for tables over 36" wide
Heat management during welding:
Full weld all joints in short intervals (a few inches at a time), rotating around the frame to disperse heat. Using intermittent welds rather than continuous welds minimizes heat input and reduces shrinkage forces by up to 75%.
Additional heat control techniques:
- Back-step welding: Deposit short weld increments in the opposite direction of general progression
- Skip welding: Lay short welds in a predetermined, evenly spaced sequence
- Balancing welds: Weld alternately on both sides of the frame to offset shrinkage
Joint orientation matters too, particularly on vertical leg sections. For thinner materials, vertical down (top to bottom) produces cleaner beads with faster travel. For stock over 3/16", vertical up welding provides deeper penetration and is the standard approach.
Step 6: Install the Tabletop and Finish
Tabletop installation:
- Clamp the steel plate or slats onto the frame
- Tack at corners and midpoints first, then verify flat contact across the frame
- Weld slats at ends and midpoints only (not continuously)
- Use short, alternating weld passes to minimize heat distortion
Finishing steps:
- Grind all sharp edges flush and clean spatter
- Apply rust-inhibiting paint to the frame only (not the tabletop — a bare or lightly oiled top allows proper grounding)
- Add leveling feet or locking casters for mobility and positioning flexibility
- Install accessories: gun holder (short pipe), lower shelf for tool storage
Key Design Factors That Affect Your Welding Table's Performance
A welding table's long-term usefulness comes down to getting the design specs right before building. Five factors drive most of the performance: top thickness, working height, surface style, flatness, and grounding. Get these right upfront — retrofitting them later is expensive.
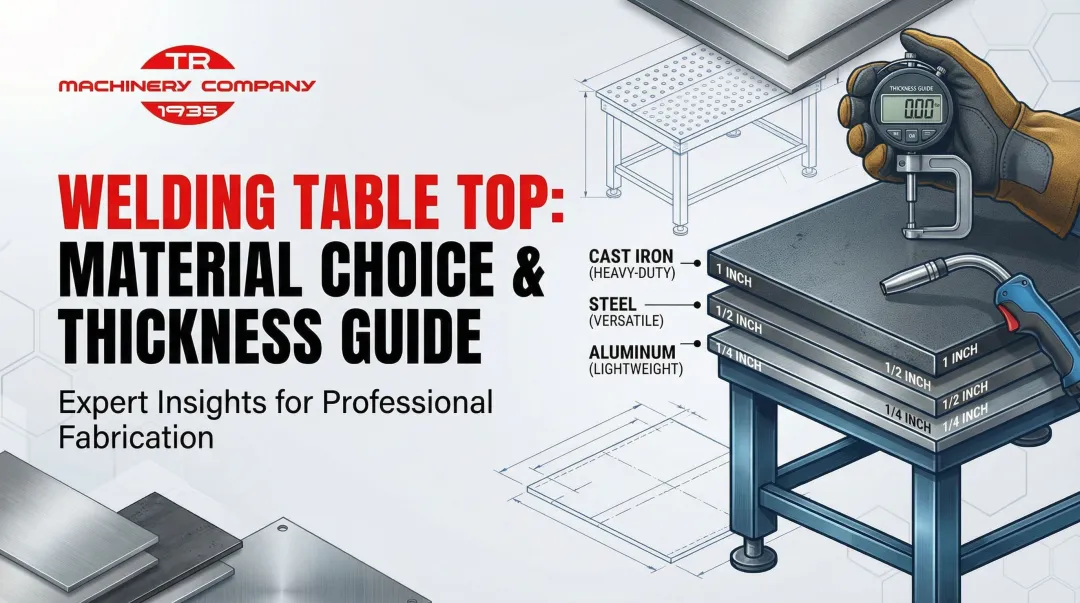
Steel Thickness of the Top
| Thickness | Best For |
|---|---|
| 3/16"–1/4" | Light hobby welding and occasional projects |
| 3/8" | General-purpose use; better heat resistance and flatness retention |
| 1/2"–1" | Heavy-duty industrial work and high-impact applications |
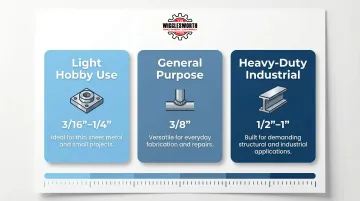
According to Texas Metal Works, 1/4" plate is sufficient for general use but requires substantial under-table ribbing to prevent deflection. Anything thinner than 3/16" will warp and bow over time under welding heat.
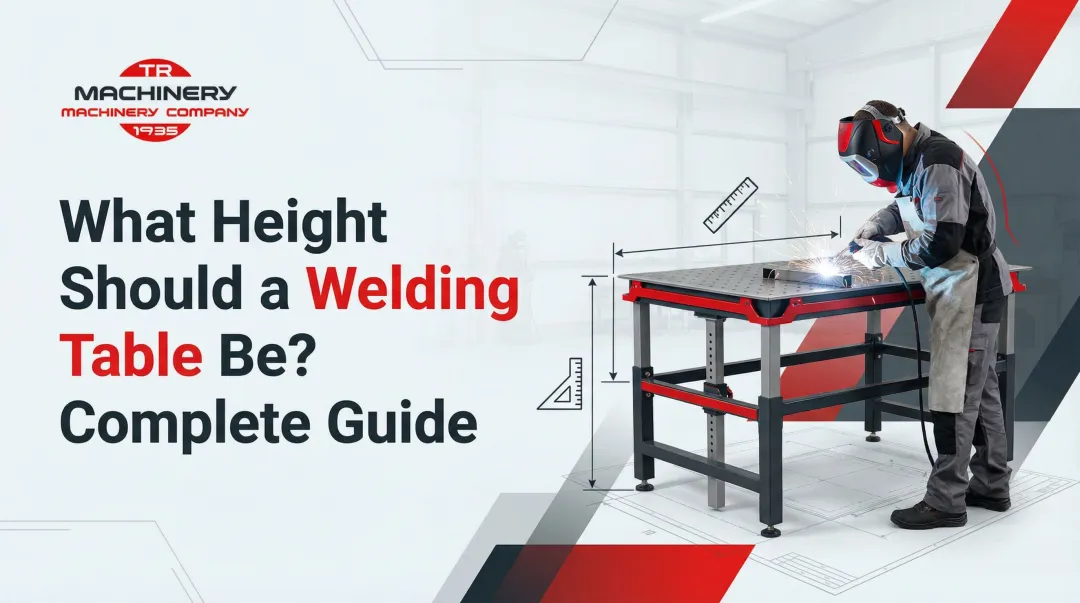
Table Height
Standard welding table heights range from 34 to 38 inches, though the ideal height depends on the operator's elbow height. Getting this wrong causes fatigue and accuracy problems over long sessions.
Height customization:
- 34–36" is best for most standing welders
- The table should sit just below the elbow when arms hang naturally
- Seated welding requires a lower height, typically 28–32"
Table Top Style (Solid Plate vs. Slats vs. Fixture Plate)
Three surface styles suit different needs:
- Solid plate — the simplest option; provides a full flat surface for all clamping operations and is the most beginner-friendly
- Slat-style — flat bar spaced ~40mm apart; lower material cost and clamp access from below, but requires careful assembly to maintain flatness
- Fixture/modular — pre-drilled hole patterns (16mm or 28mm grid); expensive and advanced, but ideal for rapid fixturing in production work
For beginners, either solid plate or slat-style is appropriate. Commercial fixture tables like the Siegmund Extreme 8.7 offer published flatness tolerances of +/- 0.019" — a level of precision DIY builds cannot match without professional machining.
Flatness and Squareness
A welding table must be flat because projects are referenced against it. If the table is warped, every piece clamped to it will also be out of square.
Achieving flatness during the build comes down to four practices:
- Use short, alternating welds to manage heat input
- Check with a straight edge after each major weld sequence
- Add adequate under-bracing for plate tops before final welding
- Let the table cool slowly and evenly — never quench with water
Grounding
The table should be grounded to the welder's work clamp so the arc circuit completes through the table. Per AWS Z49.1, connecting the work lead to a properly bonded metal welding table is permitted when the workpiece rests on it.
Proper grounding improves arc stability, eliminates the need to clamp directly to every workpiece, and makes your workflow faster and safer. Keep the top surface bare metal or lightly oiled — paint blocks the electrical connection.
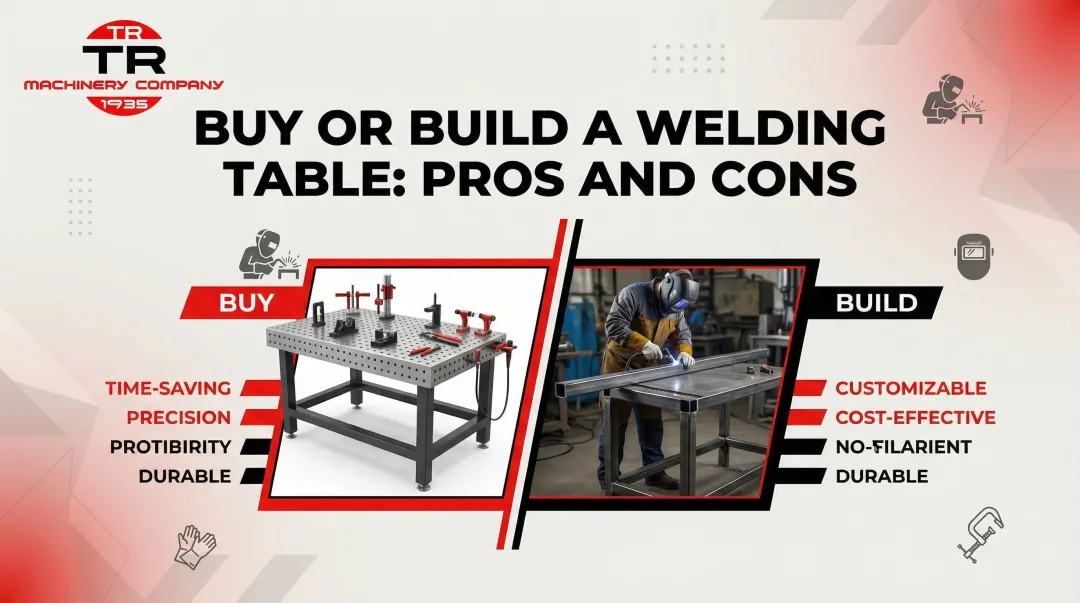
When Should You Build Your Own Welding Table?
Three factors drive this decision: your current skill level, available budget, and how much customization your work actually requires.
Build Your Own When:
- You want a beginner-friendly first project that teaches core welding and fabrication skills
- You need specific dimensions not available in off-the-shelf models
- Budget is tight — DIY builds can run $150–$200 in materials, compared to $660+ for commercial options like Certiflat's 24"x36" modular kit (note: raw plate alone, such as 3/8" A36 at 24"x48", runs around $372, so plan your material list carefully)
- Full customization is desired — height, caster placement, shelf configuration, accessory hooks
If none of those apply, buying may be the smarter call.
Buy or Skip When:
- You are brand new to welding with zero experience and haven't yet practiced basic beads
- You need a certified flat surface for precision work — commercial fixture tables offer guaranteed flatness tolerances that a DIY build cannot match
- Time is more valuable than cost savings
Common Mistakes and How to Troubleshoot Them
Build problems are normal for first-timers. Most stem from skipped prep steps or rushing the assembly process.
Frame Racking or Out-of-Square
Racking usually happens when components aren't clamped before welding, or diagonal measurements aren't checked at each stage. To fix it:
- Add sash clamps to the longer diagonal and pull it in before full welding
- Add diagonal cross bracing if the frame is already complete
- Verify diagonal measurements are equal before moving to the next stage
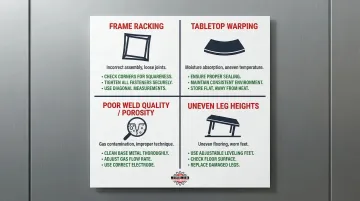
Tabletop Warping After Welding
Running long continuous welds on one section — rather than distributing heat across the top — is the main culprit. As Lincoln Electric notes, overwelding increases shrinkage forces and causes severe warping. Short, alternating passes during initial assembly prevent this entirely.
If warping has already occurred:
- Clamp the top flat while it cools for minor distortion
- Severe warps require grinding and re-welding in tension
Poor Weld Quality (Porosity, Spatter, Weak Beads)
According to Miller Welds, porosity results from gas trapped in the weld metal — triggered by mill scale, rust, paint, grease, or moisture on the joint surface. Incorrect welder settings (voltage too low, wire speed too fast) compound the problem.
To fix it:
- Strip the joint back to bare metal
- Re-prep with a grinder and acetone wipe-down
- Dial in settings on scrap material before re-welding the joint
Uneven Leg Heights / Unstable Table
Inaccurate leg cuts and uneven floors are the two causes here — often both at once. Cut legs with a chop saw and verify both ends are square before welding. If the table still rocks after assembly, install adjustable leveling feet (threaded pads) at the base of each leg to compensate for floor variation.
| Product | Product Details |
|---|---|
| 3'x3' Welding Table | Explore Product |
| 4'x4' Welding Table | Explore Product |
| 2.5'x4' Welding Table | Explore Product |
Frequently Asked Questions
Do you need a welding table for beginners?
While not strictly required, a welding table makes a real difference for beginners — it improves safety, keeps parts square, and provides a reliable ground. Improvised or wooden surfaces create fire hazards and make consistent, accurate work much harder to achieve.
Is 3/8 thick enough for a welding table?
Yes, 3/8" carbon steel is the standard minimum for a general-purpose welding table. It resists heat-induced warping and supports heavy loads, though 3/16"–1/4" is acceptable for lighter hobby use.
What is the perfect height for a welding table?
34–36" is the most common working height for standing welders, though the ideal height depends on the operator's elbow height. The table surface should sit just below the natural hanging elbow position.
What's a good size for a welding table?
36–48" long by 24–36" wide is a practical beginner size — large enough to handle most hobby and small fabrication projects without taking up too much shop space.
Why do welding tables need to be flat?
You reference workpieces against the table surface when clamping and tacking. Any warp or bow transfers directly into the project, causing parts to come out misaligned or out of square.
Does a welding table need to be grounded?
Yes, grounding the table to the welder's work clamp completes the electrical circuit and improves arc stability. It also removes the need to attach the ground clamp directly to each individual workpiece, saving time and reducing the risk of poor connections between cuts.